The Hungry Gamer Reviews Fate of the Fellowship
Games in This Video
1 game is featured in this video — it unlocks as you watch.
Transcript
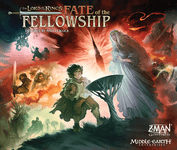
Ooh, that looks tasty. Welcome folks. A the Hungry Gamer is back with another game review and today we're talking about Fate of the Fellowship by Matt Leock and published by Zman Games. Before I get started, thank you to Zman Games for letting me use this copy for just a little while. And what this game is is this is, as you can see, the Lord of the Rings where Froto is trying to get to Mount Doom and toss the ring in. But the game is built around the pandemic system. And my understanding, even though I haven't played it, is the system, the specific system that's being used is the pandemic fall of Rome system where you have troop movements across the map. And in this game, each player is going to take on the role of two different characters.
Though what you see set up here is the aftermath of a solo game that I played. Those rules are a little bit different. And I'm hoping to have a solo playthrough so you can see how that works. I will actually describe the two-player game, but each player will take on the role of two different characters and they will take various actions, moving around the board, mustering troops, fighting evil, and accomplishing quests. Now, if you are not interested in how this game is played, you just want to jump into my final thoughts, then you want to go to the time stamp on the screen right now. For those of us still here, let's talk about how this game is played. So, there is only one way in which you can win the game. And to do that, you must take the one ring, which Frodo has, and toss it in Mount Doom. And I'll explain how you do that in just a minute. And in addition to that, in each given game, you will have a certain amount of quests. And what I have out here are the suggested starter quests. So your first game, you're always going to play with these different quests. And you must also accomplish all three of those quests before you can do this one over here. And so how it's going to work is on your turn you will select one of your two characters. So let's just say and I want to slide all this out of the way that I was controlling Mary and Pippen right here and Aowen right here. And so the first thing I have to do is I have to decide which one of those two are going to take four actions and which one is going to take one action. So, for the sake of our, we'll just say that for Mary and Pippen, I decide that they're going to take a
single action. We'll say that they are right there on the board. And as I go down, I'm just going to take their special action, which is loyal friend, which gives me one friendship token. Nice and simple. And you'll see they have other abilities here. And as we go through, they'll make sense. And then down here, A1 has her own abilities. And we will just say that she is right here in Fangorn Forest. And I'm going to move these things around a bit. And for her first action, I'm going to do what is called a travel action. And simply I'll move along a line one space like so. Then I'm going to take a muster action. And usually when you take a muster action, you have to either discard a friendship token and then you get one troop the same color as a spaceron, in this case brown, like so.
But if we look over here, we'll see that as a shield maiden of Ruhan, she gets to muster without spending the tokens. Now, if I did not have one of those tokens, I could go to my hand of cards and I could spend one card that has the friendship symbol in the top left. And the type of troop you're going to recruit will depend on the color of space that you are on. So here we would get blue troops. Down here we would get elves, the green troops. And up on the top of the board where you can't see, that's where you can get dwarves, who are the gray troops. Now that I've done that, perhaps there are some enemy troops right here. And so for my third action, I'm going to travel again. And I'm going to travel right to here. But anytime a character travels, they can take anybody they want with them. So that can be troops. Maybe if Gandalf was here, I could also bring Gandalf with me. And that would be another action.
And now this is the only way that you're going to move your troops around is if one of your characters is doing a travel action and bringing them along with them. Then for my final action, perhaps I do an attack. So then I look at how many troops do I have? I have four troops and there are four shadow troops. So, I get to choose how many dice I want to roll up to a maximum of three. And to roll three, I would have to have three troops. So, what I'm going to do is I roll those dice. And I will point out that there is a very cool dice tower that you're not seeing right now, but you will see in my playthrough, but it's a little bit unwieldy for my specific setup here. And so, now we look at the symbols here. So, right here we have each of us loses one troop. So just like that, this one here means that the shadow loses one troop.
And this one here means that we lose two troops if there is a Naz Ghoul in the area. And so as we can see in Rohan right here, there are actually two Naz Ghouls. So we would lose two troops. So in this case, perhaps I would spend a resistance token, the ring token to roll a die. And so let's say I rerolled it and I got that right there. And that means again I would lose a troop. But if I happen to be in a haven, which would be like this space here or this space here, then I would then there would be no effect. The other thing I can do is at the end of my turn, I can spend valor tokens or valor cards in order to remove shadow troops. And so we'll just say that I spent these two and removed these last two troops. Hooray for me. This brings me to another action that you can do. Of course, I would be out of actions now.
Now, at this point, I would move on to drawing cards and drawing shadow cards. But before I do that, I will explain the other actions that you can do. You can also do a fellowship action. And this is something that you do not do in the solo game because you only have one hand of cards. But that would allow you to give a card from one player to another if they're in the same location. So, in this case, I could give one of my cards to the player that's controlling Gandalf. The next action you can do is called a prepare action. And this means if you are in, and I'm going to clear out a few more things here so we can see a little better. And what this means is if you are in a region, you can discard a card of the same region. So, in this case, since I'm in Rohan, I can discard the Rohan card and then gain one of these tokens. Now, the reason you do this is because you can have a hand of unloaded tokens, but you can only have in your hand seven cards. Though, you can't trade tokens to other players. The final action you can do is you can do what is called a capture action. And so, if I remove this here, you'll see that Eisenard is evil. It's bad. We know this. And if you are ever there with a friendly troop and you spend three valor tokens, then you have captured the location and you simply get to place it like that. What that will do is that will gain you two hope and make it a place where troops can't spawn anymore.
And I did neglect to say that every time you do a combat action, the eye of Sauron is going to move to the region in which you had that fight. And that will become clear why that matters in just a bit. So then after actions are done, you get to draw two more cards and if you ever draw and sometimes you will draw an event card which is a card that you can use whenever it is that you would like even on other players turns or you might draw a skies darken card and this is one of the times and this is where that where the eye is really makes a difference. So, the first thing that happens, you'll increase the threat rate by one, and I'll explain what that does in a minute. Then, if the eye is in Froto's region, you will lose two hope.
Otherwise, you're going to move the eye to where it is. And then, you're going to add some shadow troops to a specific place on the board. And then, you will take the shadow discard pile, shuffle it, and put it back on top of the deck. And I will show you what that means in just a bit. Then, we move to the shadow phase. And this is where you're going to draw shadow cards. And you'll draw one per space you moved up on the threat track. And so in this case, we're at three. So that would mean I would draw three of these cards. And so what will happen is you'll take a card and then you flip it up like so. And then you look at the top card of the draw pile and it's going to tell you if you activate the top or the bottom. In this case, because there's a symbol here, I activate the bottom. In which case, I'll add some troops to Moria. I'll move the eye to Froto's region. And if he's already there, I'll roll a search. And I will talk about searches in just a moment. Or if you had on top of the card the red banner, you would do the top. And that's when troops are going to move. So in this case, troops are going to move from Moria towards Rivendell.
And so this is how that works. So, if this was our board setup, what would happen is we start here at Moria and all the troops are going to move to Moria following the colored path line that's on the card. So, in this case, it is a green path line. But, for example, if it said they're going from Moria this other direction, then it would tell you are they going to follow the yellow or the blue path line. And you'll see why that matters in a moment. So, first the troops move from Moria to here. Then these troops would move from here to Thorbad. There's no troops here. There's no troops here. And so that would be the end of the path. But let's just say there was a troop here. Then it would then move like that. And it would start a battle. And you would roll one dice per shadow troop that you have there. So only one would fight. If at any point shadow troops move into a haven like this and there are no troops there to and there's no troops there to defend, then they will take over the haven which will drop hope and you now no longer have that space that you can go to. And then just a couple more things that I want to point out before I move on to my final thoughts. As I mentioned, you have to accomplish different quests. So for for example, right here in the Misty Mountains, we had to take over Eisenard.
So, by doing that, I would have accomplished this quest. I'd get a reward and it would get me one step closer to being able to try to destroy the one ring. But the other two things that you need to know is you'll notice on the board there are sometimes are these symbols here. Now, I've zoomed in a little bit. You'll notice that sometimes there's these symbols on different paths that you take. So, those are paths that you can take, but you have to spend that resource to do that. So to actually move from Eisenard to Fangor forest, you would actually have to spend a single stealth to do so. Whereas over here to go along this path, you'd have to friend while over here to go on this path, you'd have to spend some friendship to do so. Now I mentioned a couple times about this search roll. And this is going to happen. Sometimes cards will do it, but in general, every time that Froto and Sam move, you will have to roll a search. And the way the search is determined is you look at first how many Naz Ghoul are in the area in this case none. And how many troops are in the location where they are going in this case none. So in this case nothing would happen. But let's just say we had one Naz Ghoul two Nazoulool here. And then we had three troops waiting there. So, if I were to move there, I would have to roll five search dice, unless I happen to spend a stealth token, in which case I wouldn't have to make the roll at all.
There's another option where I could put on the one ring. That's a special Froto ability, which would reduce hope by one, but then I could ignore these troops here, and I would only roll these two dice. So, when you roll these dice, a couple things can happen. either nothing can happen. If you are not in a haven, hope goes down by one, hope goes down by one, or one of the nasoul gets summoned back to Mordor. In other words, he would leave the board here and fly back across the map. And so this is how play will go until hopefully you have accomplished your three or sometimes four quests and then you can try to destroy the one ring. And to do that, you will have to get yourself all the way over here to Mount Doom. Spend a total of five ring resistance symbols here. And then you can attempt to throw the ring into Mount Doom. And to do this, you'll make a search roll. So in this case, I have two Nazoulool here, which would mean I roll two dice. However, however, you also add one more die for every hope that you have lost. So if I was say all the way down here, that's 1 2 3 4 5. So I would roll a total of seven dice. And then if you have survived, you win the game. In this case, I would lose one, two, three, four, which would end the game. Unless I happen to have any ring symbols left over, in which case that would allow me to roll some dice.
And any characters present could do that. So perhaps if Mary and Pippen were there as well, they could spend some out of their own hand and we could perhaps reroll these and in this case we would lose two hope one two and we would survive and win the game. And that's how this game works. So what do I like about this game? First of all, I think it's beautiful. I love that the artwork is a throwback to that 70s Lord of the Rings Hobbit movie or ' 60s or whatever the heck it was. But I love that it's that throwback to that. I I really like the aesthetic of it. I like the screen printed meeples. I like that all the little cubes are actually tiny little troops. I think that's very clever. The board is very pretty. And those ring wraith minis are really, really cool. I also think that that tower is awesome.
And I was not able to show it in either of my videos just because of my manner of shooting top down. I thought maybe I'd be able to get it into the playthrough video, but it cast a huge shadow. I didn't really have space, so whatever. But trust me when I say, it is really, really cool. I really enjoy it. Totally unnecessary, but really cool. I also like how differently all of the characters play. And it seems on the surface that you're going to spend most of your time just doing the basic actions, move, capture, attack, muster, and that's true. That is what you spend most of your time doing. But each of the abilities that these characters have comes into play in really important moments. H being able to have Legless just go take out one troop can be the difference between winning and losing.
The ability that I used with Galadriel in the playthrough allowed me to seed the deck and get what I needed for the very next player. And so all of those things, they really really work. Also, and I haven't played all of them. There's a couple of the characters I still haven't played, but it almost seems like some of the powers are more or less situational, and it kind of lines up with the story. Look, I love Faramir as much as the next guy, probably more than anybody else. What a raw deal the dude gets, but his powers are a little bit situational, right? You're going to get a bonus if you move through the area that has a special path token. You don't do that as much, and maybe I'm reading into things, but I really like that. I think that's very clever the way it works. And just like in the books when the these characters show up, the things that they do are so very important. And so when their powers come up, they're so very important. But on the other hand, you have someone like Mary and Pippen that every single round can just get you a friendship token. That's huge. Huge.
So I love that. I love the way it works. And I love how different the game feels even if you're using the exact same scenarios just by changing characters. When I swapped out Legless for Gollum, that suddenly changed the entire game. Suddenly I was like, "Oh my gosh, I gotta get Gollum with Froto and Sam and get them into Mordor because he's going to be able to keep them from getting spotted in and the getting found with the search checks. Just really really cool. But then on the other hand, when you play with Aowen or you play with when you play with Aoin or Gimy or Rwin, suddenly you are you're mustering troops and you're actually suddenly like this army commander cuz it's so easy to get a bunch of troops and move them around and take things over. Really, really, really clever. I love the way that works. I also like the variety of different quests. Even though again on the surface it seems like you're kind of doing the same thing. Take stuff here and do a thing because the board is so big again it really changes what you're doing. If you got to go all the way to the eastern side of the board and take over rune or null whatever the heck that one is then that's going to change the gameplay because you're gonna have to get a bunch of troops and move them out there and you might have to go through the shadow troops on the way. just really really clever. The next thing I like is the troop movement. And my understanding is this is the same as it is in Pandemic Fall of Rome, but it really works. This
idea that a line activates from here to here and all the troops are going to move down the line. Very, very cool and very very frightening because so many times you have to make a choice. You're like, "Okay, I can move off of this space, and if I do that and take these troops, I'm going to be able to do a thing I need to do, but if in the next two turns this line moves, I'm in trouble." I love having to make that choice, even though I'm almost always wrong when I do make that choice. And I also really like the way as you're flipping over the cards, you're going to get the top or the bottom. You never really know what's coming, but it's just makes it exciting and it lets you use those same cards that you're going to be putting back on top of the deck every time the skies darken, which I also like because it makes your areas that you've already started activating, it means they're going to activate again quicker. But never knowing is it going to be the top or the bottom kind of gives you a hope even though you know that certain things are coming. sometimes like, oh my gosh, I really need it to be the red flag because I've cleared this area out.
There's no danger for me if this line activates. But if it's the black flag, I haven't gotten Frodo out of the region and he's going to get seven dice. It's just very, very fun, very clever, and very hard. And then the last thing that I'm going to say here is I really like the solo. And depending on who you talk to, the solo is either a harder or easier. I think I feel like it's a little bit easier myself or maybe just cuz my brain works better that way. But I kind of like that I have four characters and I'm just going to go boom boom boom boom boom and Froto and Sam are always going to be moving one. But it adds this challenge of I might have to wait a long time before I get to activate one of my characters again. So it has a really interesting balance to it. I really really enjoy it and it's probably my preferred way to play though I do enjoy the other one as well. But either way, it's a really really challenging challenging and satisfying game. Which brings me to what are my quibbles with the game. It's really hard. It is very very hard. You're probably going to lose far more often than you win and it can be really swingy. In fact, I played with Mrs.
Hungry Gamer the other day twice. In the first game, we lost in like 15 minutes just because we didn't the the card draws we had, we couldn't get any stealth and we couldn't get Frodo moving without rolling searches. And we kept rolling searches and the searches we kept rolling even after re-rolling was despair, despair, despair, despair, despair. And we just lost really, really quick. It was an outlier. But that kind of thing can happen. And I'll also say, and if you go watch my video, you'll see there was a dice roll at the very end that determined if I won or lost. Just one roll when I thought I planned it out perfectly. And for me, I don't mind that. If you've watched my channel enough, you know I I like chaos. I like that things can turn at the last moment. But just understand that it can in this you can draw cards and it keeps activating lines that you've cleared or it can keep activating the bottom side and you get search search. So there is some swing that can go in there and it's just has and it's just something that you have to decide does this bother me or does this not bother me and for me it doesn't. Then the the only other thing that I will say is as cool as it looks on the board. There are times when it just gets full of bits and pieces and you're like okay where is that? I don't know. You're sliding pieces here. You're moving the ring race. You're trying to slide more troops underneath. You're knocking ring race over and that might be a sign of my bad play. But sometimes a board can get really really full which is very very terrifying and very cool to look at but can make the reading of bits
a little bit harder here and there and that's pretty pitily of a quibble there because as you can tell overall I really enjoy this game. So there you have it folks that is Lord of the Rings Fate of the Fellowship. This is going to be available sometime this year here in the US. Apparently it's already available in the UK but you can pick it up for pre-order right now. I get to hold on to this. I just found out for about two and a half more weeks I get to hold on to this before I have to return it. So, I'm going to make good use of it myself. So, there you have it, folks. As always, if I made any mistakes in the rules overview, please let me know in the comments with a time stamp so I can get that in the cling on subtitles. If you found this video useful, please like, subscribe, share, maybe become a channel member. As always, thank you so much for watching. Have a wonderful, wonderful day.